K280 Build Platform Standoff


K280 Build Platform Standoff
Published 2019-10-16T15:55:11+00:00
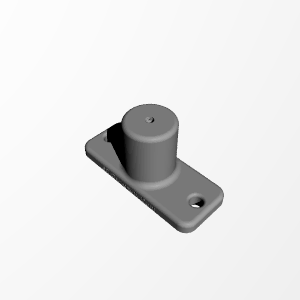
A robust and sturdy 3D Printable Build Platform/Heated Bed Standoff for the He3D K280 Mega Delta or any other delta 3D printer built with 20mm slotted extrusions. The design replaces the adjustable spring standoff supplied with the K280 kit, which proved problematic in my environment. A threaded M3 hole on top of the standoff facilitates mounting the bed with M3 screws.
The main advantage of the fixed standoffs is that once the printer is calibrated, it will likely remain so for the rest of its life. My K280 has been in production with these standoffs since the fall of 2017. The only adjustments I had to make since, was to adjust the overall height when changing nozzles, using the “baby step” (micro stepping) software function.
The parts can be easily 3D printed, without any support, on a modern inexpensive 3D Printer. They can be printed with a variety of materials, including PETG, ABS and many other types of heat tolerant printable materials.
ABS works very well for this application. Alternately, PETG should be almost as good, but I have not tested it.
I strongly recommend against using PLA to make this object because during normal operation of your 3D printer, it will be exposed to high temperature exceeding ~55 C (~ 130 F). At such temperature, PLA will most likely warp.


Recommended print settings with a .4 mm nozzle
- Layer Hight: .150 ~.160 mm, depending on motors and gearing
- 4 perimeters or shells (1.8 ~ 1.9 mm)
- 12 bottom layers (1.8 ~ 1.9 mm)
- 12 top layers (1.8 ~ 1.9 mm)
- Infill 20~30%, depending on infill type
Note: 3 Standoffs are required to mount the build platform.
Additional items needed for assembly
- 3 x Countersunk Head Screws M3x20 (M3x25 Screw Optional)
- 6 x Socket Head Screws M4x10 (M5x10 Screw Optional)
- 6 x Slotted “T” (Hammer) M4 Nuts (M5 “T” Nuts optional)
Assembly Instructions
- 1- Position and mount the three bed standoffs 120 degrees apart on top of the 20mm slotted extrusions, aligned with the corresponding mounting holes in the heat bed. Secure them to the extrusion’s slots with the six M4x10 screws and “T” nuts.
- 2- Attach the heat bed to the standoffs with the three M3x20 countersunk screws. Apply just enough torque to secure the parts snugly together - DO NOT OVERTIGHTEN!
| Date published | 16/10/2019 |
| Tempo per farlo | 52 - 120 Minuti |
| Quantità di filamento | 7.2 grams each |
| Dimensioni | 50mm X 20mm X 25mm |
| Supporto Gratuito | YES |