The Impossible Puzzle Made Possible By FDM Printing


The Impossible Puzzle Made Possible By FDM Printing
Published 2018-05-31T10:48:07+00:00
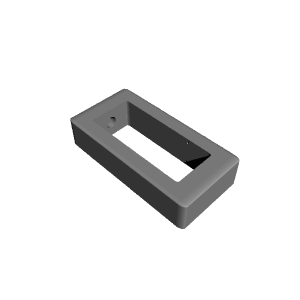
I designed this puzzle after seeing something similar by Mr. Puzzle. By 3D printing the puzzle you'll know the secret mechanism that makes it possible so it's no longer really a puzzle for the maker. However, its sure to stump your family and friends. Unlike the wooden versions that have glued joints, FDM printing makes the piece seamless and a real puzzle to those who do not understand what's happening inside.
I designed the holding compartment (cage) to either hold a spark plug (https://amzn.to/2slQRGe) or a 1/8" (5-32/6-32) x 3" bolt/threaded rod (https://amzn.to/2IXsJFb or https://www.lowes.com/pd/Hillman-6-to-32-x-3-in-Phillips-Slotted-Combination-Drive-Zinc-Plated-Machine-Screws-5-Count/3035868 or https://www.lowes.com/pd/Hillman-1-8-in-x-3-in-Standard-SAE-Threaded-Rod/3127739). A 3" x 1/8" Toggle Bolt would also work if you have those lying around. Of course metric equivalents are effective too. Other objects could also work. Add some nuts or wing nuts to the bolts for added effect - the wingnut makes for a very interesting puzzle with the threaded rod.
The bottom of the object just needs to fit into the 5mm hole in the bottom of the cage. Two 2mm steel rods (https://amzn.to/2H3PZeT) keep the object trapped inside. Each one is 35mm in length.
The secret is the small 2mmx5mm steel rod secreted inside, held in place by a 1mmx3mm neodymium magnet (https://amzn.to/2IX71B2).
The steel rods are placed while the peice is being printed, leterally becoming part of the object. Details are in the printing section.
To solve the puzzle (ie release the spark plug or bolts), simple knock the puzzle against your hand or hard object, causing the 5mm steel rod to fall down. Without tipping puzzle, the free steel bar to the side and slip it out by pulling it away from the puzzle while sliding back again. The object inside can now be freed. For more details check out the video: https://youtu.be/dKaclSiJrHg


PLA works fine.
Print with 10 walls or print it completely solid. The 10 walls are needed to make sure the 5mm hole is fused with the bottom. Smacking the puzzle down, especially with a spark plug inside, can break through thinner plastic in no time.
Pause the print at ~ layer 25 and again at ~ layer 196 (depending on the orientation of the object). Both are just past the halfway point of the slots for the 2mm steel rods. One will also have the 3mm cavity for the magnet and 2x5mm rod. As oriented in the uploaded file, layer 25 should have those pieces. Glue the magnet in first using a fast setting super glue. Then add the smaller 2x5mm rod and the longer 2x35mm rod. Make sure the longer rod fits the gap, especially on the other side. It won't do any good if it comes loose on its own! At layer 196, pause the print again and place the second 2x35mm rod. Double check that it fits securely. After placing both rods, monitor your printer closely to make sure it doesn't accidentally knock out a rod. Once the rods are covered it should be good to concinue as normal.
When it is done printing, the puzzle is in the locked position. To unlock, smack it down on a hard object to cause the smaller rod to fall and enable to the removal of one of the steel rods.
| Date published | 31/05/2018 |
| Tempo per farlo | 280 - Minuti |
| Quantità di filamento | 19.5 meters |
| Dimensioni | 100x40x22 |
| Tecnologia | FDM |
| Complessità | Easy |
| Supporto Gratuito | YES |