DIY 10$ LASER Microscope - Microscopio LASER casero 8€


DIY 10$ LASER Microscope - Microscopio LASER casero 8€
Published 2021-12-17T10:46:10+00:00
This is a print in place support that helps to arrange a imple but effective practical experiment for children of all ages.
Using only a disposable 10ml syringe and a laser pointer we can show the students a high magnificaton projection of the microorganisms, bacteria or any other microscopic samples suspended in a drop of water.
The most powerful and collimated the laser pointer is the sharper results we'll achieve.
Este soporte permite montar de manera sencilla y reutilizable un experimento para niños de todas las edades.
Usando únicamente una jeringa desechable de 10ml y un puntero laser podemos mostrar a los estudiantes una proyección ampliada de microorganismos, bacterias, microalgas o cualquier otro elemento en suspensión en una gota de agua.
Cuanto más potente y enfocado esté el puntero mejor resultado tendrá la práctica.


Materials needed - Lista de materiales
- 1 x 10ml Syringe (~0,30€)
- 1 x 3W Laser 303 (~7€)
- 1 x water solution to be analysed
***
- 1 x jeringuilla de 10ml (~0,30€)
- 1 x puntero Laser 303 (~7€)
- 1 x muestra líquida a analizar
Skills Learned
Optics
Microscope
Biology
Duration of Lesson
30 minutes
Preparation
Step 1 - Paso 1
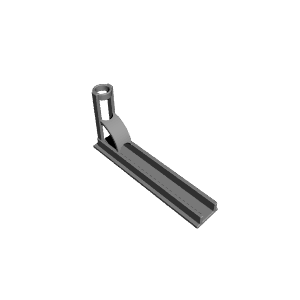
Print the support using the attached stl. Source Fusion360 file is also attached to make customization easier. The support provided has been tested with a Laser 303 which has 21mm diameter and a 10ml syringe of 19mm diameter.
***
Imprimir el soporte adjunto. Se incluye también el fuente en en Fusion360 para facilitar la adaptación en caso de que sea necesario. El soporte proporcionado ha sido probado con un puntero Laser 303 de 21mm de diámetro y una jeringuilla desechable de 10ml y 19mm de diámetro.
Step 2 - Paso 2
Collect a liquid sample in the syringe. An example of common samples can be:
- puddle/mud water
- aquarium water
- phitoplancton sample
- blood diluted in physiological saline
- saline artemia (sea dragons)
***
Recoger una muestra de líquido en la jeringa:
- agua de un charco
- agua de acuario
- muestra de fitoplancton
- sangre diluída en suero fisiológico
- artemia salina
Step 3 - Paso 3
Place the syringe inside the ring and let a drop of liquid hang from the syringe.
***
Colocar la jeringa en el anillo y presionar el émbolo hasta dejar una gota colgando de la misma
Step 4 - Paso 4
Place the laser horizontally and point the light beam to the drop of liquid. The drop will act as a lens and the magnified image will be projected to the wall or screen behind.
***
Colocar el laser en el carril y apuntar el haz de luz a la gota de líquido. La gota actuará a modo de lente y la imagen ampliada de la muestra se proyectará a la pared o pantalla situada detrás.
References
This is [a detailed project](https://www.sedoptica.es/Menu_Volumenes/Pdfs/OPA48-2-115.pdf "OPA48-2-115.pdf") of a similar approach by J.L. Garcia-Pomar *, G. Cristobal.
***
Aquí hay [un proyecto](https://www.sedoptica.es/Menu_Volumenes/Pdfs/OPA48-2-115.pdf "OPA48-2-115.pdf") de una solución similar, por J.L. Garcia-Pomar *, G. Cristobal.
| Date published | 17/12/2021 |
| Benoetigte Zeit | - 420 Minuten |
| Support Free | YES |