simple laser cross-hair for Wabeco™ drill press


simple laser cross-hair for Wabeco™ drill press
Published 2021-08-06T06:44:54+00:00
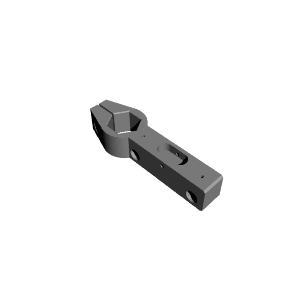
This model is for mounting a cross-hair laser to your Wabeco™ drill-press.
Inspired by this video by "Offys Werkstatt" (https://www.youtube.com/watch?v=0oZdQoxT2HQ). I opted to design a simplified version.
Key features:
- only a single part to print
- laser modules can be aligned flush with the bottom so you do not accidentally mess up your focal adjustment
- sufficient accuracy if the distance to your workpiece is reasonable (if your requirements sup)
- cut-out in the back and holes for cable management (for hiding your solder joints or simply using the holes for cable ties)
Required hardware:
- two line-laser modules (Ø12mm) Note: I suggest adding a strain relief with some heat shrink tubing
- 1 bolt M8 x 30mm with nut (the size is mainly for aesthetics)
- electrical wires and a battery box or usb connector to supply 3V-5V to the laser modules (I use some velcro to attach a battery box to the body of the drip press)
- optional: two small machine screws to keep up the clamping force required to hold the laser modules in place
Calibration:
- do the main focal adjustment of the laser modules before mounting them
- install a small size drill bit to your drill press and use some pliers to gently rotate the laser modules so their lines meet right at the tip of the drill bit


- do NOT print using SUPPORTS
- print the model in the given orientation
- print with at least 3 outer perimeters to add some strength needed for clamping the laser modules
- your 3d printer should produce fairly accurate results for this to work: hexagonal shaft is 30mm (model is 30.1mm), laser is ~12mm (model is 12.15mm)
| Date published | 06/08/2021 |
| Menge an Filament | 55g |
| Dimensionen | 155mm x 47mm x 28mm |
| Support Free | YES |