Marbelvator, Armed (but not dangerous!), Back On Tracks.


Marbelvator, Armed (but not dangerous!), Back On Tracks.
Published 2017-03-28T11:15:45+00:00
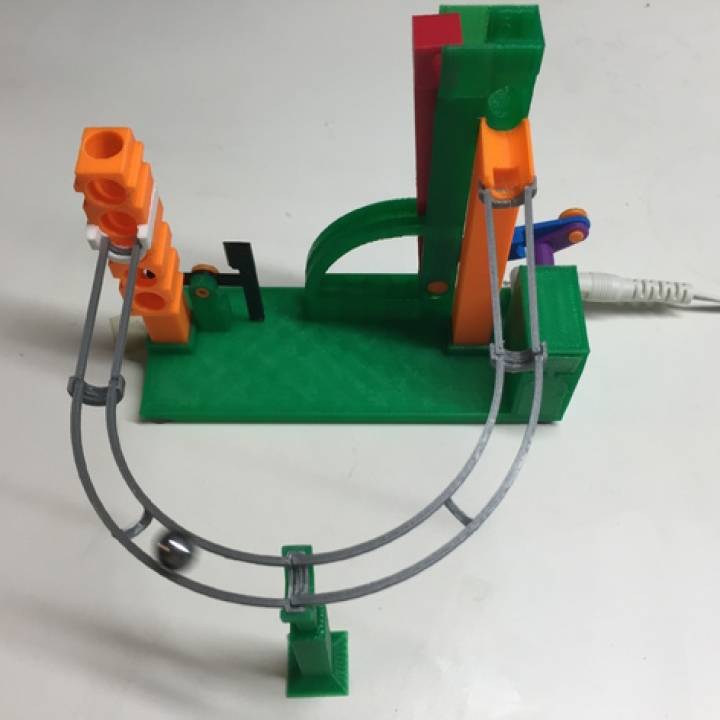
A freeform track version of Marbelvator, Armed (but not dangerous!). Print as many track sections and trestles as you desire, and design your own track! You can build a simple two piece track without trestles, or expand your track with trestles as long as gravity allows. "Track, Tower End.stl" contains five entry points, allowing an almost unlimited amount of track configurations, thus you can test your own track design skills. Start small, end wherever you chose.
Video of prototypes are here: https://www.youtube.com/watch?v=_8yNXA3dxdo&feature=youtu.be,
and here: https://www.youtube.com/watch?v=ZLuxL0AXqpE.
Designed using Sketchup Make 2015, and printed in PLA on a Makerbot Replicator 2 using Makerware 2.3.3.42 "Standard" Settings (.2mm layer height, 2 shells, 10% infill).


Parts I purchased:
1) 60RPM Speed Reducer Rectangle Shape N20# Magnetic Mini Geared Motor 6V DC (Amazon, http://www.amazon.com/gp/product/B00AUCGJX0/ref=oh_aui_detailpage_o08_s01?ie=UTF8&psc=1).
2) Coaxial Power Jack (Radio Shack part number 274-1583).
3) 3.0 Vdc Power Supply (Radio Shack part number 273-315 with the "N" style plug 273-345, you get one free with the power supply).
4) 1 "marble" (8mm ball bearings purchased at a local Ace hardware store, also available on Amazon).
5) Rubber sticky feet (available at hardware and dollar stores).
6) Double sided tape (available at woodworking, hardware and dollar stores).
Study "Assembly.skp".
Print all pieces as shown in "Assembly.skp". Carefully remove the hold down pads on "Base.stl" and "Track End.stl".
Test fit and trim, file, sand, etc. all parts as necessary for smooth movement of moving surfaces, and tight fit for non moving surfaces. Depending on the colors you chose and your printer settings, more or less trimming, filing and/or sanding will be required.
Assemble the base components as shown in "Assembly Track Freeform.skp".
Lubricate all contacting moving surfaces with light machine oil.
Wiring is pretty straight forward and simple, however you'll need minimal soldering skills and soldering equipment. Basically, solder a 3" red wire between the gear motor "plus" terminal and the coaxial power jack "Center" terminal, then solder a 3" black wire between the gear motor "minus" terminal and the coaxial power jack "Shield" terminal.
Once assembled and wired, test the position of "Track, Tower Start.stl" and "Track, Tower End.stl" to make sure "Arm Lift.stl" can pick up a marble and deposit it. Once properly positioned, I used a very, very small dot of thick cyanoacrylate to keep both in place, applied using a toothpick.
Next, design a track, and print as many straight, curved and trestle components as required. Assemble the track by pressing the male and female ends of the track segments together. Assemble the trestles by sliding the trestle tower into the trestle base. Apply double sided tape to the bottom of each trestle base, snap it into position at the desired track joint, then stick it to the surface you are building your track on. Remember, if anything moves or shifts, the Marbelvator will not be reliable, so make sure enough trestles are used and that each trestle, and the Marbelvator base, are secured to a flat surface.
When I design a track, I time it using the track length and power supply voltage such that only one marble is in "Track, Tower End.stl" at a time. Thus for short tracks, I use only one marble, but for longer tracks, I use 2, 3 or more. With the power supply I purchased, depending on the track length, I'll run it at 1.5 to 6vdc in order to have the marbles arrive at "Track, Tower End.stl" at just the right time.
If you have any questions, post a comment and I'll do my best to answer.
| Date published | 28/03/2017 |
| Technology | FDM |